In the pursuit of energy efficiency for homes and buildings, insulation plays a central role. Among the array of insulation options, injection foam stands out for its impressive performance and convenience. When installed properly, injection foam insulation can provide decades of lasting comfort, lower energy bills, and help maintain consistent temperatures.
Understanding the Basics of Injection Foam Insulation
Injection foam insulation is an innovative home insulation option that significantly boosts energy efficiency. This insulation is installed in the form of foam by being injected into walls, filling the wall cavity for maximum air sealing. The foam fills all cracks and crevices upon injection, providing an excellent air barrier instead of traditional insulation. It can be installed in both exterior and interior walls by a professional.
Why Choose Injection Foam Insulation?
Homeowners choose injection foam for its impressive R-value per cubic foot. Here are some additional benefits:
- Air Sealing: The foam seals gaps and cracks, reducing air infiltration and improving energy efficiency.
- Improved Sound-deadening: It can also help reduce noise transmission through walls.
- Non-Invasive: It is often used in retrofit projects because it can be installed without tearing down walls or making significant structural changes.
- Longevity: Properly installed injection foam insulation can last for the lifetime of a home without losing its thermal properties.
Furthermore, injection foam insulation can control air movement, resist heat flow, and reduce thermal bridging – contributing significantly to the comfort and energy efficiency of your home.
Spray Foam versus Injection Foam: Which is Right for Me?
Before we dive into the R-value and other properties of injection foam, it’s important to differentiate between spray foam insulation and injection foam. Spray foam insulation is good for open wall cavities. This process requires you to remove the drywall, paneling, or other interior materials to open up the wall cavity, then use spray foam for effective insulation.
On the other hand, injection foam can be injected from the outside to fill wall cavities, meaning you don’t need to remove or replace walls beforehand. Typically, injection foam is less expensive than removing walls and applying spray foam. However, if your walls are already exposed, spray foam may be a good fit. It’s always important to consult a professional who can give you expert recommendations.
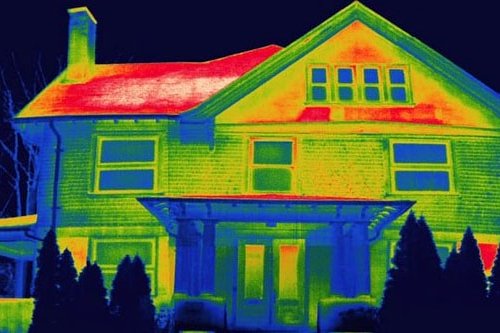
The Role of R-Value in Energy Efficiency
The Definition of R-Value
The R-value is a measure of thermal resistance – specifically, the ratio of temperature difference across the insulator to the heat flow. A higher R-value means the insulation provides greater resistance to heat transfer, enhancing energy efficiency. Typically, the injection foam insulation R-value is among the highest in insulation options.
R-value impacts energy efficiency by limiting heat loss or gain within the home. For instance, a higher R-value can limit heat loss from your home to the exterior in a cold environment, reducing the energy demands on your heat pump. Conversely, in hot conditions, a high R-value can minimize heat gain, limiting the use of air conditioning units or heat pump dryers.
Injection Foam Insulation R Value
There are several high R-value insulation options available today, but few can match the consistency of injection foam insulation. This type of insulation provides an efficient air seal, enhancing insulation per cubic foot and limiting air filaments. When you work with Cincinnati RetroFoam, you’ll benefit from our quality RetroFoam insulation. For homes with standard 2×4 studs, the walls can have an R-value of up to R-16 when we install RetroFoam!
Ins and Outs of Installing Injection Foam Insulation
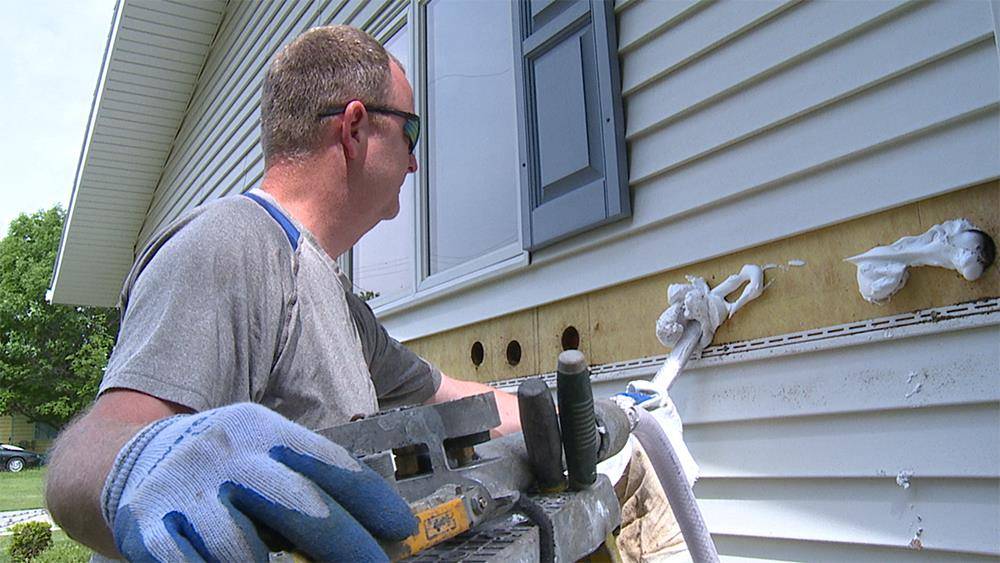
Step-by-step Process of Installation for Siding
The installation process of injecting foam insulation into existing walls is simple. If you have walls with vinyl or aluminum siding the installation can be done without drilling through the siding ‒ just by removing a row around the entire house.
Once the siding is removed, a 3-inch hole is drilled into each wall cavity. An installer then runs a tool up and down the cavity to look for obstructions in the wall. They also feel for the next stud to have an idea about the size of the cavities.
If obstructions are found in the cavity, installers will remove another row of siding above or below it and drill another hole. This ensures the cavity is filled.
Once this is done, the installer will inject RetroFoam. The installer runs the injection hose from the top of the cavity to the middle while injecting the foam. Then, they will run it from the bottom up to ensure the foam gets into all the nooks and crannies. After the foam is injected, the holes are plugged, and the siding is replaced. The installers will clean everything up and leave your home looking just like it did before they arrived.
Now, let’s explore injection foam insulation installation for other popular materials.
Installation for Brick
The installation process for injection foam for brick is different from vinyl or aluminum siding, as it does not make sense to remove the brick to gain access to the wall cavity. In this case, the installer will drill three ⅝-inch holes into the mortar to reach the wall cavity. A hole is drilled at the top, middle, and bottom, which ensures the foam is injected into the cavity and fills it completely.
Once the foam is installed, the holes are filled with mortar.
Installation for Wood
The process of installing injection foam insulation with wood siding depends on the condition of the wood. If the wood is in good condition, the installer can remove it and drill holes into the sheathing underneath. Once installation is complete, the holes are plugged, and the wood siding is replaced.
If the wood is brittle, the installer will drill through it to ensure it doesn’t break. In both cases, injecting the foam is the same as for vinyl or aluminum siding. The hose is run from top to bottom to ensure the foam completely fills the cavity.
Installation for Block
When it comes to installation for concrete block walls, the installer will drill holes into the middle of the wall to access the cores. The bricks’ cores are lined up, so once the holes are drilled, injecting the foam will fill those and other nooks and crannies in the space. Once the cores and openings are filled with foam, the holes are filled with mortar.
Installation for Stucco
If your home has stucco siding, the installer will drill three ⅝-inch holes at the top, middle, and bottom of each cavity. This ensures the wall cavity fills completely with foam. Once the holes are drilled, the foam is injected into the wall through each hole. Upon completion, the holes are filled with mortar.
Installation for Drywall or Plaster
If RetroFoam needs to be installed from the inside, the prep work is essential to avoid having drywall dust all over your space. First, the installer will ensure all surfaces and items in the area of the home where injection foam will be installed are covered in plastic. Then, the installer will draw a chalk line on the walls and drill the holes centered on that line.
Next, the installer will run the hose to the top of the cavity and inject the foam. The hose is run from the top to the middle and from the bottom up to ensure the cavity is full. Once the foam is installed, the holes are plugged, and a patch of drywall mud is applied.
Considerations for DIY vs Professional Installation
Though some homeowners opt for DIY insulation installation, this is not possible with injection foam. Injection foam requires professional equipment unavailable on the market for DIY enthusiasts.
While the installation costs may be higher than installing other forms of insulation yourself, it’s important to consider the long-term benefits. Unlike other forms of insulation, injection foam will maintain its thermal resistance for the lifetime of the home, so you’ll never have to worry about replacement. Plus, you can continue reaping the energy savings and benefits of this insulation.
Implications for Sustainability & Environment
One of the most compelling arguments for injection foam insulation is its energy efficiency. An effective air seal can significantly reduce the energy needed for heating and cooling your home. Injection foam insulation, with traits like high R-value, resistance to air movement, and long lifespan, can dramatically lower your home’s carbon footprint, making this insulation type an environment-friendly choice.
Choose Cincinnati RetroFoam for Your Insulation Needs
At Cincinnati RetroFoam, our RetroFoam injection foam is the best solution on the market to help stop energy loss through your walls. Our foam can be installed from the outside or inside of the home, so whatever size space you need to insulate, we’re here to help. Plus, thanks to its superior sealing and insulation properties, our RetroFoam starts immediately paying for itself.
In addition to injection foam, we offer spray foam and blown-in insulation. We can work on existing homes, new construction, pole barns, and commercial properties. We are proud to offer impeccable workmanship and customer service to every job. Contact us today to learn more or request your free quote.
Frequently Asked Questions
How effective is injection foam insulation?
When appropriately installed, injection foam insulation is a highly effective way to insulate your property, maintain consistent temperatures, and reap long-term energy savings.
Is injection foam insulation worth it?
Yes! Although it requires an up-front investment, injection foam insulation can be a wise investment that saves you big in the long run.
Can you do injection foam yourself?
No, it is not safe or feasible to DIY injection foam insulation. Thankfully, professionals can do a thorough job with installation and give you lasting comfort in your home.